Adding Data for a New Employee for Pre-Employment
About Adding New Employee Data
When adding new employees to PeopleSoft, there are several steps. If you've determined that the new employee does not already exist in PeopleSoft, you are ready to add the employee and data.
The Employee Personal Data component is used to record the new employee’s personal and demographic information as well as certain pre-employment information required by Human Resource Services and other areas that issue ID Cards, Library access, and computer accounts. You must complete this information for all new State and Research Foundation employees. You will obtain this information from the Demographic Form that the new employee completed.
Finding Employee Personal Data to Add a New Employee in Peoplesoft
From within PeopleSoft, click on Main Menu > SBU > SBU Human Resources > Use > Employee Personal Data
Add a New Value (Employee)
The first screen to add a new employee shows a Find an Existing Value option. If you found the new employee using Search/Match, update the employee information instead of adding him/her new.
If you did not find the new employee using Search/Match
- Click the Add a New Value tab
- Leave NEW in the Empl ID box and click Add
Personal Data
- In the Name section of the Personal Data1 tab, the Effective Date will default to today's date
- Click Add Name
- Complete the name information
- Choose the appropriate Prefix
- For First and Last Name, be sure to use upper and lower case letters (e.g., Bob not BOB)
- For Last Name, do not add credentials (e.g., do not add DDS, MD, PhD, etc.) to the name
- Click OK
- In the Biographical Information section, complete:
- Date of Birth (required) in the following format mm/dd/yyyy
- For Birth Country, leave USA even if the person was born elsewhere (HR will update the country as necessary when adding I-9 information)
- In the Biographical History section for Effective Date, enter the employee's hire date (you cannot enter a future date, so if the hire date is in the future, leave today's date because the effective date must be on or before the hire date).
- Select the Gender and Highest Education Level
- Select the Marital Status (when entering a new employee, do not worry about changing the As of date)
- Enter National ID (Social Security Number). Leave blank if unknown because only a valid SSN should go here.
Contact Information
- Click the Contact Information tab
- Click Add Address Detail
- Click Add Address
- Complete the home address information, click OK, and click OK again
- If entering a foreign address, click Change Country first, and then enter complete home address information, click OK, and click OK again
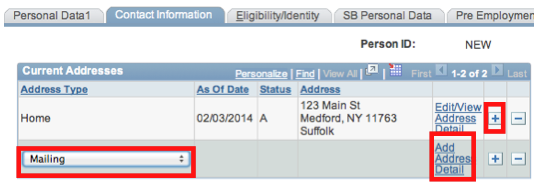
- To add another Address Type (such as a mailing address)
- In the Current Addresses area, click the add a new row
 button to the far right of Address Type
 - Select the appropriate Address Type and then repeat steps 2-4 to enter the address
- If any new rows are added accidently, be sure to delete them by clicking the remove row
 button
- In the Current Addresses area, click the add a new row
- In the Phone Information section, select Home for the Phone Type and enter the complete telephone number, including area code
- Also add Office Phone (required)
- In the Phone Information section, click the add a new rowbutton to the right
- Choose Office 1 for Phone Type
- In the Phone Information section, click the add a new row
- For Preferred in Phone Information, check the box next to the preferred phone and uncheck any other phone numbers so that only one is selected the preferred
- For Email Addresses, add the home/personal email if known (Campus Email will populate automatically)
Eligibility/Identity
- Click the Eligibility/Identity tab
- Be sure the Regulatory Region is USA (always)
- Select the Ethnic Group by clicking the magnifying glass
 button
 - Select the Military Status
- Do not fill out the History section or I9 information; these will be completed by HRS staff
SB Personal Data
- Click the SB Personal Data tab
- Enter the Domestic Partner/Spouse Name (with either format: First Last or Last, First)
- Under Citizenship Status, select USA as Country
- Click the magnifying glassbutton for Status to selelct his/her status in the USA: for US Citizens choose Native; for Non-US Citizens, choose one of the other options (Naturalized, Alien Permanent, Alien Temporary, Permanent Resident, Employment Visa, Undocumented Alien, Other, Non Indicated)
- For non-US Citizens, click the add a new rowbutton, and then for Country, select his/her country of citizenship, and for Status select Native
- For non-US Citizens, click the add a new row
- If the person doesn't have a Social Security Number and they've been assigned a temporary USB number, enter it in the Campus ID/Pseudo ID field. Otherwise, leave this field blank.
Pre Employment
The information in this tab must be completed for all new State and Research employees. It is also used to facilitate getting an ID Card (not a Badge), SOLAR account, email account, and Library access for employees BEFORE the hire process is completed by HR (see step 39).
- Click the Pre Employment tab
- For OFFICE ADDRESS, Enter Zip + 4 and click the tab key on the keyboard, and the Building# will automatically populate; then add the Room number in the Room field
- In the Pre-Employment section, complete the following:
- Action Dt defaults to today’s date.
- For Hire Dt, enter the employee's actual Hire Date. If hire date changes before the employee starts, this must be modified.
- For Eff Date, enter the Effective Date--the date that you want this pre-employment information to become effective--a day between today’s date or in the future up to 70 days before the employee’s hire date for those employees who need to obtain an ID Card, SOLAR account, email account and/or Library access early. Do not enter a date earlier than today.
- Select Business Unit; RSFND (for Research) or USBNY (for State).
- For Dept, enter the Department ID (6-digit budget account code followed by 2 zeros). If you do not know the Department ID, click the magnifying glass button and search for the department by name.
- Status should default to Active when adding a new employee. It will automatically be changed to Inactive once the hire process is completed by HR.
- For Email, and/or Library access, check the box(es)
- The Fac/Staff and SOLAR box will be checked automatically, if applicable, when you enter the Dept ID. This information is used to indicate that the new employee needs an ID Card and SOLAR account.
- If this is a Southampton employee, check the box for this option.
- Note: you will not use the add a new rowbutton for this tab when you first enter information; new rows are only added if you need to change any of this information after it is entered and saved. If you do make any changes, remember to add the Effective Date for the change
Save
- Once you've entered all of the required information on the pages in Employee Personal Data, click the SAVE button
- After saving, the new employee has been assigned an Empli ID (Stony Brook ID) number.