Adding Data for a New Non-Employee
When adding new non-employees to PeopleSoft, there are several steps. If you've determined that the non-employee does not already exist in PeopleSoft, you are ready to add the employee and data. If the non-employee does already exist in PeopleSoft, update the non-employee data instead of adding him/her new.
Finding Add Non-Employee in Peoplesoft
- From within PeopleSoft
- Click on Main Menu and then click on SBU
- Select SBU Campus Community and then click Use and then click Add Non-Employee
Adding Non-employee Data
There are several tabs of information to complete for new Non-employees, but first, add the person.
- In the Add Non-Employee tab, click Add the Person
- Note: If you forgot to check for the non-employee in Search/Match, click Search for Matching Persons to access Search/Match from this screen
Biographical Details
- In the Name section of the Biographical Details tab, click Add Name
- Complete the name information
- Choose the appropriate Prefix
- Be sure to turns Caps Lock off and use Mixed Case letters (i.e., capitalize the first letter in names, not the whole name)
- Do not put credentials in with the last name (i.e., don't include DDS, MD, PhD, etc.)
- Click OK
- In the Biographical Information section, complete:
- Date of Birth (required) in the following format mm/dd/yyyy
- For Birth Country, select the country
- Leave Campus ID blank unless the person doesn't have a SS#. If s/he doesn't, contact HR to get a USB number for the non-employee and enter that number here (if s/he later gets a SS#, don't remove this USB number; just add the SS# in National ID)
- In the Biographical History section,
- For Effective Date, enter the employee's hire date (you cannot enter a future date. If the hire date is in the future, leave today's date because the date entered here must be on or before the hire date).
- Select the Gender
- Select the Marital Status (when adding someone new, the As of does not need to be changed)
- For National ID, enter Social Security number. If s/he does not have a SS#, contact HR to get a USB number for the non-employee and enter that in the Campus ID field above and leave National ID blank (when the person gets a SS#, do not remove the USB#; just add the SS# for National ID)
Contact Information
- Click the Contact Information tab
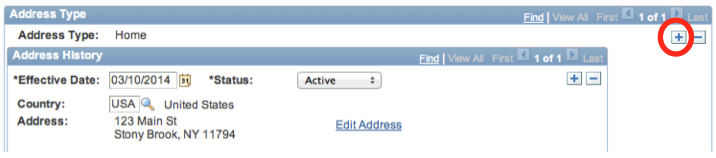
- Click Edit Address
- Complete the home address information and click OK
- If entering a foreign address, click Change Country first, and then enter complete home address information and click OK
Note: In order to enable Library access (in Non-Employee Info), the non-employee must have a local Home Address. For those with foreign addresses, enter their office address for Home, and then add another row and the international address as a mailing address.
- If entering a foreign address, click Change Country first, and then enter complete home address information and click OK
- To add another Address Type (such as a mailing address), click the Add a new row
 button to the far right of Address Type, select the appropriate Address Type, and then repeat steps 2-3 to enter the address
- If any new rows are added accidently, be sure to delete them by clicking the remove row
 button
- If any new rows are added accidently, be sure to delete them by clicking the remove row
- For Ethnic Group, click the magnifying glass
 button to the right of Ethnic Group to select the appropriate option
Non-Employee Info
The Non-Employee Info tab is very important. This is where you indicate the person’s affiliation with the University. This information is required for obtaining an ID Card/Badge, email account, and/or Library access (note: library access requires a US address in Contact Information).
- Click the Non-Employee Info tab
- Complete the following (note: grayed-out fields default to the values specified):
- Action Dt defaults to today’s date.
- For Begin Dt, enter the date the person will begin working/ volunteering
- For Eff Date, enter the date that the information you are entering on this page becomes effective
- For Expected End Dt, enter the date that the person will stop working/ volunteering. This field is important even if the date is just an estimate.
- For non-employees, never add an Actual End Dt
- For Status select Active
- For Title, select a title from the list of values provided in the Lookup table
- For Employer, select who the person is affiliated with/working for (i.e., the non- Stony Brook University organization)
- For Dept, enter the Department ID (the main state budget account number (8 digits long) of the department where the person will be working/volunteering. If you do not know the Department ID, click the magnifying glass button and search for the department by name.)
For Category, click the magnifying glass button to select a category, if applicable (categories are rarely used—primarily for non-salaried Faculty).
Note: If you do not see an appropriate Employer, Title, or Category, please contact the Campus ID Card Office and ask for one to be added.
- Fac/Staff will automatically be checked if the title assigned is allocated a Fac/Staff ID Card/Badge.
- For Email, check the box if this person needs an email account (the email account will be active until the Expected End Date indicated on this Non-Employee Info page). Also, the following information must be completed:
- Social Security Number (found in the Biographical Details tab)
- Office Address with zip+4 (found in Office Address tab)
- Expected End Date (found in this tab, Non-Employee Info)
- For Library, check the box if this person needs Library access (the non-employee must go to the library and follow the normal campus procedure for opening an account. Access to the library lasts until the Expected End Date indicated on this Non-Empoyee Info page). Also, the following information must be completed:
- Home Address (found in the Contact Information tab) must be local; for those with foreign addresses, enter office address for Home, and then add another row and the international address as a mailing address
- Department ID (found in this tab, Non-Employee Info)
- Expected End Date (found in this tab, Non-Employee Info)
- Terminated Employee, Retired Employee, or Faculty Emeritus cannot be changed when adding new Non-employee
Office Address
Use this page to record the University office address and phone number for this person. Office Zip+4 is required.
- Click the Office Address tab
- Complete the following
- For Zip_4, enter the 4 digit office zip code and then click the Tab key
- For Building #, when you tab out of the Zip+4 field, the building number will automatically be inserted here
- For Room #, type the office room number
- The Contact Category fields is not being used
- For Phone Type, click the magnifying glassbutton and select OFF1 for the University phone number
- For Phone Number, enter the complete phone number (for Office Number, use xxx-xxxx format)
- To add another Phone Type, such as a person's cell or home phone number, click the Add a new rowbutton in the phone number section and then follow steps 5-6
For Email Type, select the Type (Campus, Home, or Other) and enter the complete email address
Note: Be sure to enter at least one form of contact information in case anyone needs to contact the non-employee
- Click the Add a new rowbutton to enter another Email Type.
Save
- Click the tabs to go back through each page and review the information that you entered for accuracy
- Click the SAVE button
- The Stony Brook ID (Empl Id) will be assigned when you save
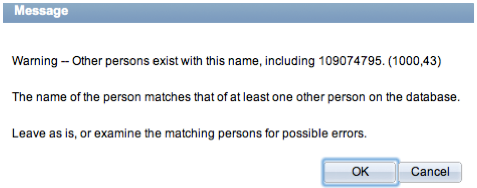
- You will receive a warning if someone exists in the database with the same inforamtion as the new person you are trying to add. More than one person can have the same name in PeopleSoft; however, two people should not have the same National ID.
Learn more
Watch this video for more