Viewing and Creating Assignments When Hiring Students
- Under Manage Student Workforce, click Department Assignments
Type in the Department ID and click the Search Icon

- Your department is identified by an 8-digit Department ID. You should know this number before you start. If you don’t know this number, go back to the SOLAR home page by clicking on the Home link. Then click Find DeptId From Account Code. You can also put your insertion point in the Department ID field and hit Enter on your keyboard to list all department IDs.
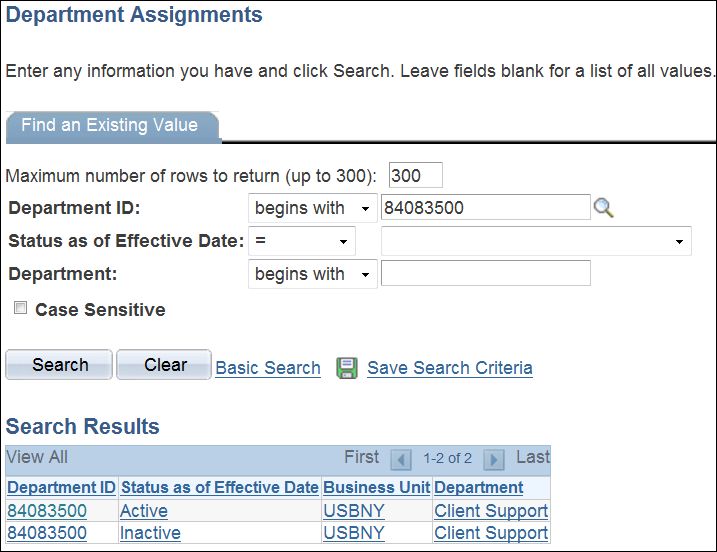
- Click to view either the Active or the Inactive assignments.
- A list of assignments will be displayed:
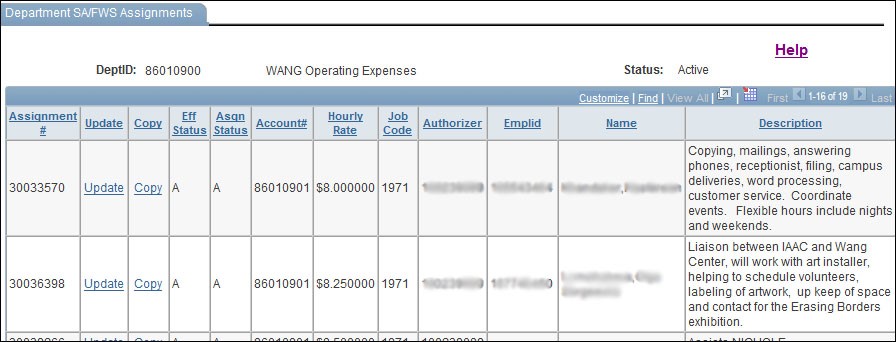
- Use the tools at the top right of the records list to view all items if necessary:

Not Seeing Assignments?
- See Finding Job Assignments After Creating Them if you do not see a new job assignment that was just created.
- You may see assignments in the "active list" whose end date has passed. These old assignments will be moved to the “inactive” list in the Fall of each year.
- If you do not see assignments here to copy, contact Student Payroll at 2-6388 for an assignment to be created for you to start with.
Creating New Assignments by Copying Existing Assignments
- From the Department SA/FWS Assignments screen, with your assignments loaded, click the copy link in the row of the assignment you wish to copy.
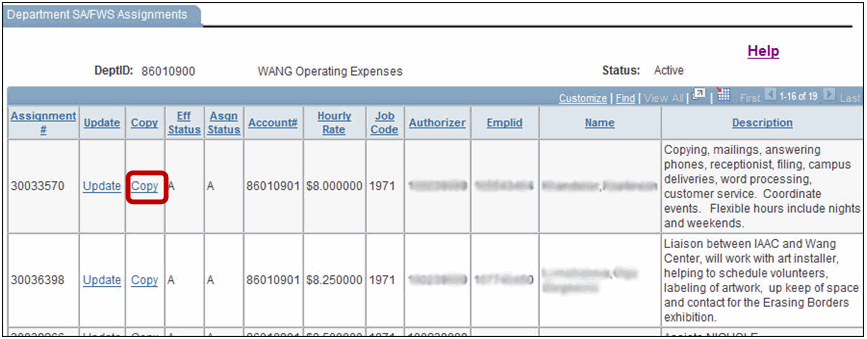
- You can copy either a “filled” or “vacant” assignment. If you copy a filled assignment, the student information will not be copied over.
Then enter the number of copies you want to make.

- When assignments are created, go back Home and then click Department Assignments again to list all the past and present assignments. Your department assignments will be listed below current assignments or on the next page. Click View All to see all assignments.

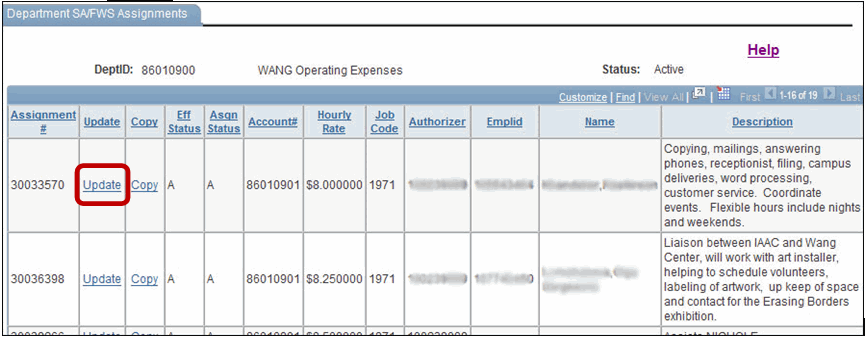
Updating a New Vacant Assignment
From the Department SA/FWS Assignments screen, with your assignments loaded, click the update link in the row of the assignment you wish to update.
- NOTE: Assignments are sorted oldest to newest, you will find your new assignment(s) on the last page at the very end of the list.
- The Update Assignment page is displayed:
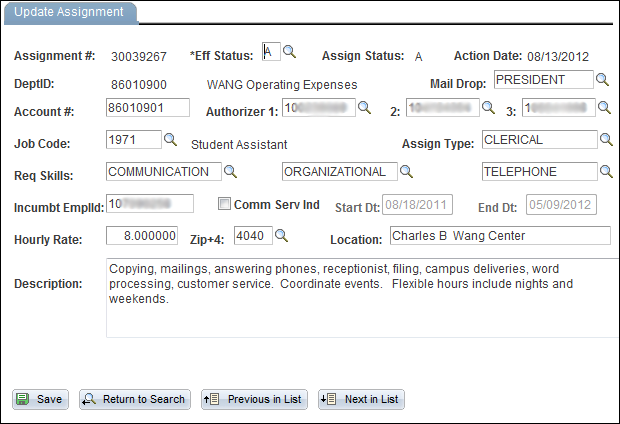
Getting to know the “Update Assignment” Fields
- Assignment # - Displays present assignment number
- *Eff Status - Select A for Active and I for Inactive. Select Active if you are ready to hire a student. Select Inactive if you do not want to post the assignment yet and then change it to Active when you are ready to post it.
- Assign Status - P indicates Pending and the new assignment’s information is incomplete. A indicates Approved and all the required data for this assignment has been entered and saved.
- Action Date - This is the last time this record was modified (the most recent date where an action as occurred on this page).
- DeptID - Displays your 8-digit Department ID (State Budget Account).
- Mail Drop - Enter your Mail Drop (where your students’ checks will go). Click the magnifying glass to lookup your Mail Drop.
- Account # - Enter the 8-digit account number that will be used to pay this student. This must be 8-digits so you may have to add two zeros to the end of a 6-digit account number.
- Authorizer 1,2,3 - Enter the SOLAR ID number of each person who can approve timesheets for this assignment. Click the magnifying glass to lookup a SOLAR ID by name. **NOTE: It is recommended that you assign more than one Authorizer. While all three Authorizers can approve time sheets, only Authorizer 1 will appear in the Supervisor field when the student views this assignment online.
- Job Code - Select 1721 if the assignment must be filled with a Federal Work Study Student. Select 1971 if the assignment must be filled with a Student Assistant.
- Assign Type - Click the to choose the most appropriate assignment type. If you do not see an appropriate choice, contact the Financial Aid office to have it added.
- Req Skill - Click the and choose the most appropriate skill(s). If you do not see an appropriate choice, contact the Financial Aid office to have it added to the list.
- Incumbent Empl ID - Leave this blank. It will automatically be populated when you hire a student into this assignment.
- Start Date - Leave this blank. It will automatically be populated when you hire a student into this assignment.
- End Date - Leave this blank. It will automatically be populated when you hire a student into this assignment.
- Hourly Rate - Enter the hourly rate without the dollar sign. The hourly rate must be at least minimum wage. Refer to the Financial Aid’s Student Employment Handbook for pay rate guidelines.
- Zip+4 - Enter the 4-digit internal zip code of the location of the assignment. Click the magnifying glass to lookup the zip.
- Location - Enter the building and room number of the location for this assignment.
- Description - ***Do not enter any information in the description field at this time. Instead, click SAVE. After you save, a description will populate in this field based on the “Assign Type” you previously selected. You should modify it with more specific information (including who to contact for an interview) and then save it again.
For More Information Contact
Customer Engagement and Support