Customizing the Zoom Waiting Room to Help Attendees Sign into the Zoom App with SSO
You can customize the Zoom waiting room to guide attendees in signing into the Zoom app with SSO, ensuring smoother access to your meetings.
Zoom Hosts can restrict meetings so that only authenticated (signed in) users that are signed into the Zoom App can get into meetings. Restricting meetings to only authenticated who are signed in with SSO has benefits. On the one hand, it allows hosts to successfully implement pre-assigned breakout rooms and prevent Zoom Bombing. It also allows hosts to get accurate attendee reports. However, on the other hand, this can create a barrier into the meeting if the attendee is not signed in properly with their Stony Brook Single Sign On (SSO) credentials. This article will show you how to migate that barrier by implementing and customizing the Waiting room to capture attendees who are not signed in and then provide them instructions on how to sign into the Zoom App with SSO correctly. It is important to note that when users are signed into the Zoom App with their Stony Brook credentials they will generally be signed in automatically every day until they sign out or if their computer receives a major update.
*It is a good idea to communicate to your attendees ahead of time if you require them to authenticate into the Zoom App for your meetings. You can send them this link which will instruct them on signing into the Zoom App with SSO.
More information about Zoom's Waiting Room.
- Sign into the Zoom Web Portal: stonybrook.zoom.us
- Click on Settings
- Turn on Waiting Room by clicking on the slider to the right:
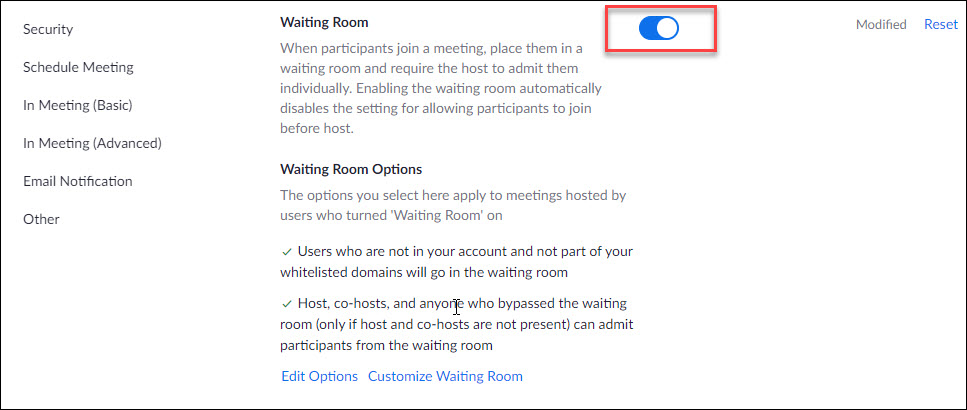
- Under Waiting Room Options, click on Edit Options.
• Choose: Users not in your account - This will put everyone who is not signed in with SSO (NetID) into the waiting room.
• Optional: check off - "Users invited during the meeting by the host or co-hosts will by pass the waiting room"
• Optional for "Who can admit participants..?": select "Hosts, co-hosts and anyone who bypassed the waiting room.."
When finished, click Continue to go back to the Zoom Web Portal.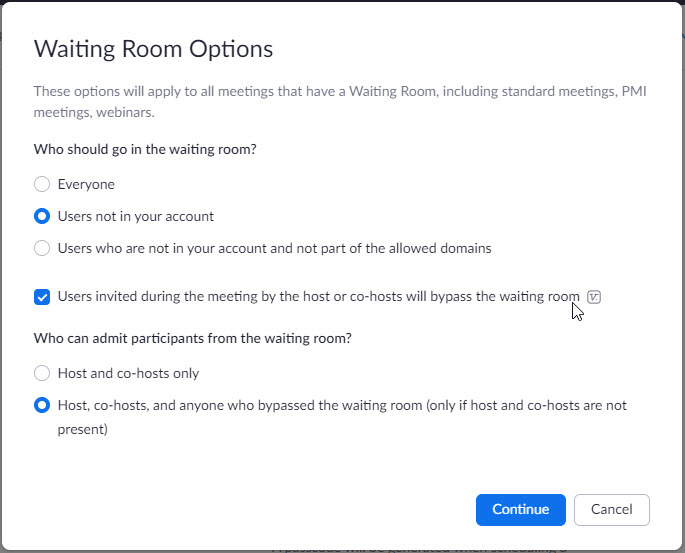
- Click Customize Waiting Room. This is where we will add instructions on how to sign into the Zoom App with SSO so the attendees can bypass the Waiting Room.
- When you customize the Waiting Room
- Click the pencil in the Title area to add a title. You can add something like: "Sign into the Zoom App via SSO (NetID) to skip this Waiting Room"
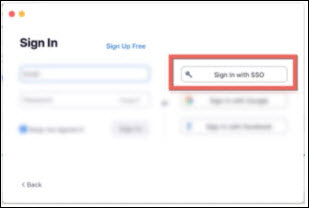
- Click the pencil in the image area to add this image of how to sign in with SSO. Download this image to your computer by right-clicking on it and selecting Save Image As.
- Click the pencil to add specific instructions. You can use this text:
"This waiting room was set up so that it would capture those who did NOT sign into the Zoom App Via SSO (NetID and password). Please close this window, locate the Zoom app on your computer and sign in via SSO so that you can BYPASS the waiting room. It is important that you update your Zoom app regularly and ensure you are signed in via SSO before Zoom sessions. it.stonybrook.edu/services/zoom"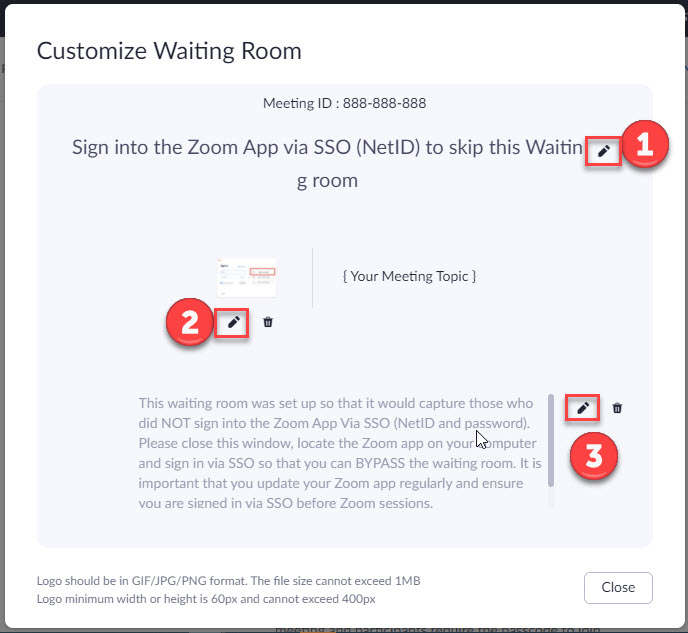
- Click Close when you are finished.
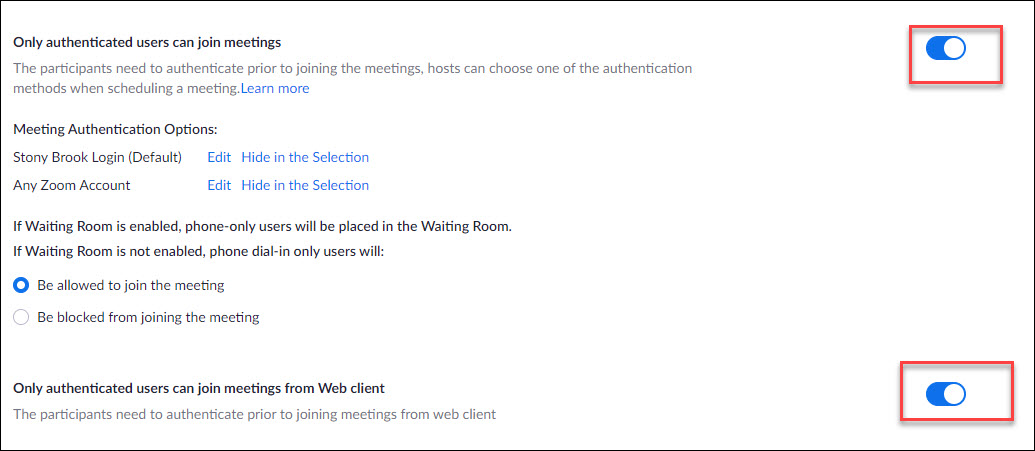
- Ensure that Only authenticated users can join meetings and Only authenticated users can join meetings from Web client is turned on.
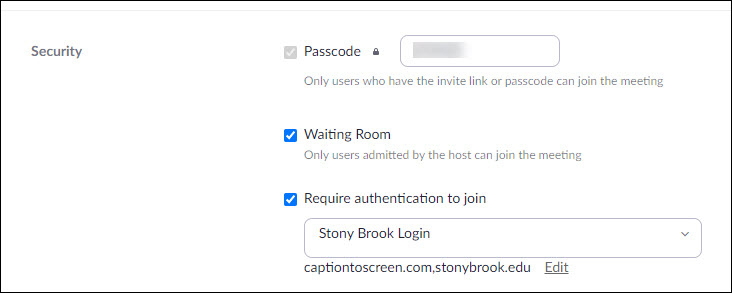
- Create your Zoom meetings like your normally would but ensure that the Waiting Room and Require authentication to join is checked off:
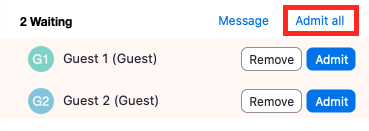
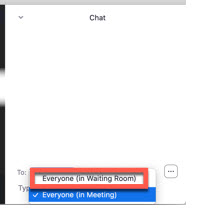
- During your meeting you may see people in the Waiting Room and you will be prompted to admit them. You can hold off admitting them to see if they close their window (leave the waiting room), sign in with SSO and then bypass the waiting room. If time allows you can send a message just to those in the waiting room by clicking on Chat > To: Everyone in Waiting Room to encourage them to follow the instructions provided.
Otherwise, if you need to start the meeting, you can admit them into the waiting room by clicking on the Participants button > Admit or Admit All.