This KB Article References:
SOLAR for Faculty & Staff
This Information is Intended for: Faculty, Staff, Teaching Assistants
Last Updated: January 17, 2024
Average Rating: Not Rated
This Information is Intended for: Faculty, Staff, Teaching Assistants
Last Updated: January 17, 2024
Average Rating: Not Rated
Your feedback is important to us, help us by logging in to rate this article and provide feedback.
Each term Grade Rosters are available in the Faculty Center, in SOLAR, for Mid-Term Grade submission and for Final Grade submission. You must navigate to the correct term, enter the grades in that correct term (saving often), and then submit grades under the Approval Status field.
To help avoid any issues when entering grades via SOLAR, save regularly and watch for the “spinning wheel” located at the top right of the page. When entering grades, wait for the wheel to stop spinning before clicking or making additional changes. Some internet browsers have been found work better with SOLAR. Therefore, if you experience any processing issues or problems, please try using a different internet browser.
Things To Know Before You Start
- You must submit your grades using SOLAR
- University Grading Policy can be found using the following link: http://www.stonybrook.edu/policy/policies.shtml?ID=207
Submitting Grades via Excel File to Registrar's Office
- Faculty or instructors that want to submit grades to be uploaded to SOLAR via excel file should send it to the following email address: submit_grades@stonybrook.edu
- Please be sure to include the following information with your file: TERM, CLASS NUMBER, SBID, and FINAL COURSE GRADE
Enter Grades in SOLAR
- Navigate to the Grade Roster for the Correct Term and Class in SOLAR:
- From the SOLAR homepage, click Faculty Center under Instructor Self Service

- Click the Change Term button and select the Term that you are submitting grades for. You'll see the list of classes that you are authorized to enter or submit grades for.
- Click the Grade Roster
 button to the left of the class. You will only see this button when grades are allowed to be submitted (last day of classes).

Tip: The icons to the left of each class represent Class Roster , Grade Roster, and Photo Roster
 , respectively
- From the SOLAR homepage, click Faculty Center under Instructor Self Service
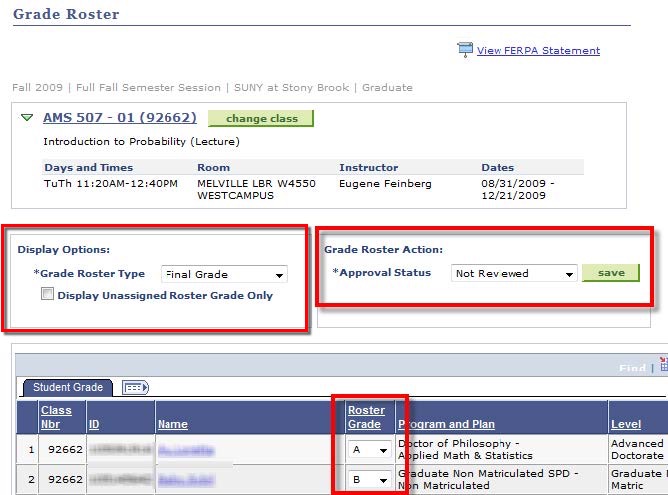
- Enter grades.
- Under Display Options Type, Grade Roster Type, chose Mid-Term Grade or Final Grade, as applicable
- For Grade Roster Action, Approval Status, select Not Reviewed
- In the Roster Grade column, enter the grade for each student
Tip: Save often so you don't lose your work by clicking the save button next to the Grade Roster Action, Approval Status field (because SOLAR will time out after 20 minutes of inactivity). Because you are entering grades under the Approval Status Not Reviewed, grades will be validated and errors identified each time you save but that is expected while saving to keep work while still entering grades. - Note: If there is not a drop-down box to choose a grade for a student, it means that the student has officially “Withdrawn” from the course. You do not have to enter anything for this student.
- Note: Graduate students cannot receive grades of “D”.
- Submit grades:
Follow these instructions when all grades have been entered and are ready to be reviewed and submitted:- For Grade Roster Action, change the Approval Status field:
- Select Ready to Review if you are not the Primary Instructor for the class and do not have approval status to submit grades.
- Select Submit Grades if you are the Primary Instructor and you’ve reviewed all grades and are ready to submit them.

- Click Save when finished. You will receive a message if there are any errors.
- Once submitted successfully, you will no longer be able to make any changes.
- For Grade Roster Action, change the Approval Status field:
- Printing the Grade Roster: Click "Printer Friendly Version".

- Click the Faculty Center tab to return to that page.

- Click Home near the top left corner to return to the SOLAR Home Page
