Copying Zoom Cloud Recordings to Echo360 Automatically
Zoom will be charging for storage of recordings, and because of this, recordings will be deleted from the system on a regular rolling basis. However, you can have your Zoom Cloud Recordings copied automatically to Echo360 and be saved there.
This is an opt in setup and you must have a Zoom account and an Echo360 account for this to work. A benefit of this approach is that Zoom meetings you might want to remain private (eg. office hours) will not be directly published to any course.
Another thing to note is that this integration is for cloud recordings from Zoom. If you are recording locally, you would have to upload from the “upload media” dropdown in your Echo360.org library and then share it to your course.
When this is fully enabled though, the Zoom recordings will be automatically sent to Echo360 library, and optionally, to an associated course, so that:
- Students see all video items from one location
- Students may use the learning tools associated with Echo360, such as note taking, flagging for confusion, bookmarks, and Q&A
- Instructors get gather greater analytics re: student views and engagement
- Use the Echo360 video editor for zoom recordings
- Use the transcript/captions editor from Echo360 (and choose from either the automatically created Zoom or Echo360 to start from – we haven’t done an analysis yet to see if one is better than the other.)
How to opt in and connect the videos to a particular course.
Opting in, only shares the Zoom recordings to your Echo360 media library. It does not connect it to a course, so this part is good for creating recording backups and does not expose content in any way to the public.
- Login to your Echo360 account by going to echo360.org and logging in with your Stony Brook email address followed by your NetID and password info.
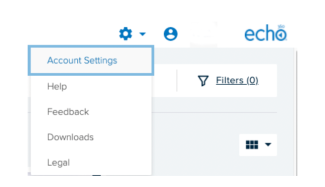
- Go to the gear icon -> Account Settings
3. From there click on Zoom Settings in the left column
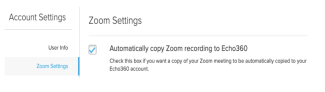
- Check the toggle to On
- Now the meetings are set, going forward, to be added to your Echo360 library. There is a table of Zoom Meeting IDs, with their Meeting Name and where they are currently mapped to go.
- If you don’t want to share any of these zoom meetings, leave them mapped to “Library Only”.
- If you do want to associate a zoom meeting room with a particular course, simply use the drop down menu under Echo360 Sections, to choose which course/section you want that Zoom Meeting ID mapped to. You can always come back to this Account Settings page to turn this feature back off.